
Scrolling through your feed and spotting a celebrity with the exact hair colour you’ve been dreaming about? You’re not alone. Learning how to recreate a celebrity’s hair colour shade at home has become a skill worth mastering, and it’s far more achievable than most people realise.
Whether you’re drawn to Margot Robbie’s buttery blonde, Dua Lipa’s bold cherry red, or Zendaya’s rich copper tones, the right technique and products can get you remarkably close. Professional-quality results no longer require a professional-level budget.
At Smart Beauty, we’ve helped thousands of at-home colourists achieve their dream shades using our vegan, cruelty-free formulas enriched with plex technology. This guide covers the essential steps, product recommendations, and practical tips to help you achieve that celebrity-inspired transformation from your own bathroom.
What you need before you copy a celebrity shade
Before you mix a single formula or apply any colour, proper preparation determines whether you’ll achieve that celebrity-worthy result or end up with an expensive mistake. Most at-home colour failures happen because people skip this stage entirely, jumping straight to application without understanding what their hair actually needs.
Your shopping list and prep work should happen at least 48 hours before you plan to colour. This gives you time to gather supplies, conduct essential tests, and adjust your approach based on what you discover about your hair’s current state.
Essential tools and materials
You’ll need more than just the colour formula itself to recreate any celebrity shade successfully. Professional results require professional preparation, even when you’re working from home.
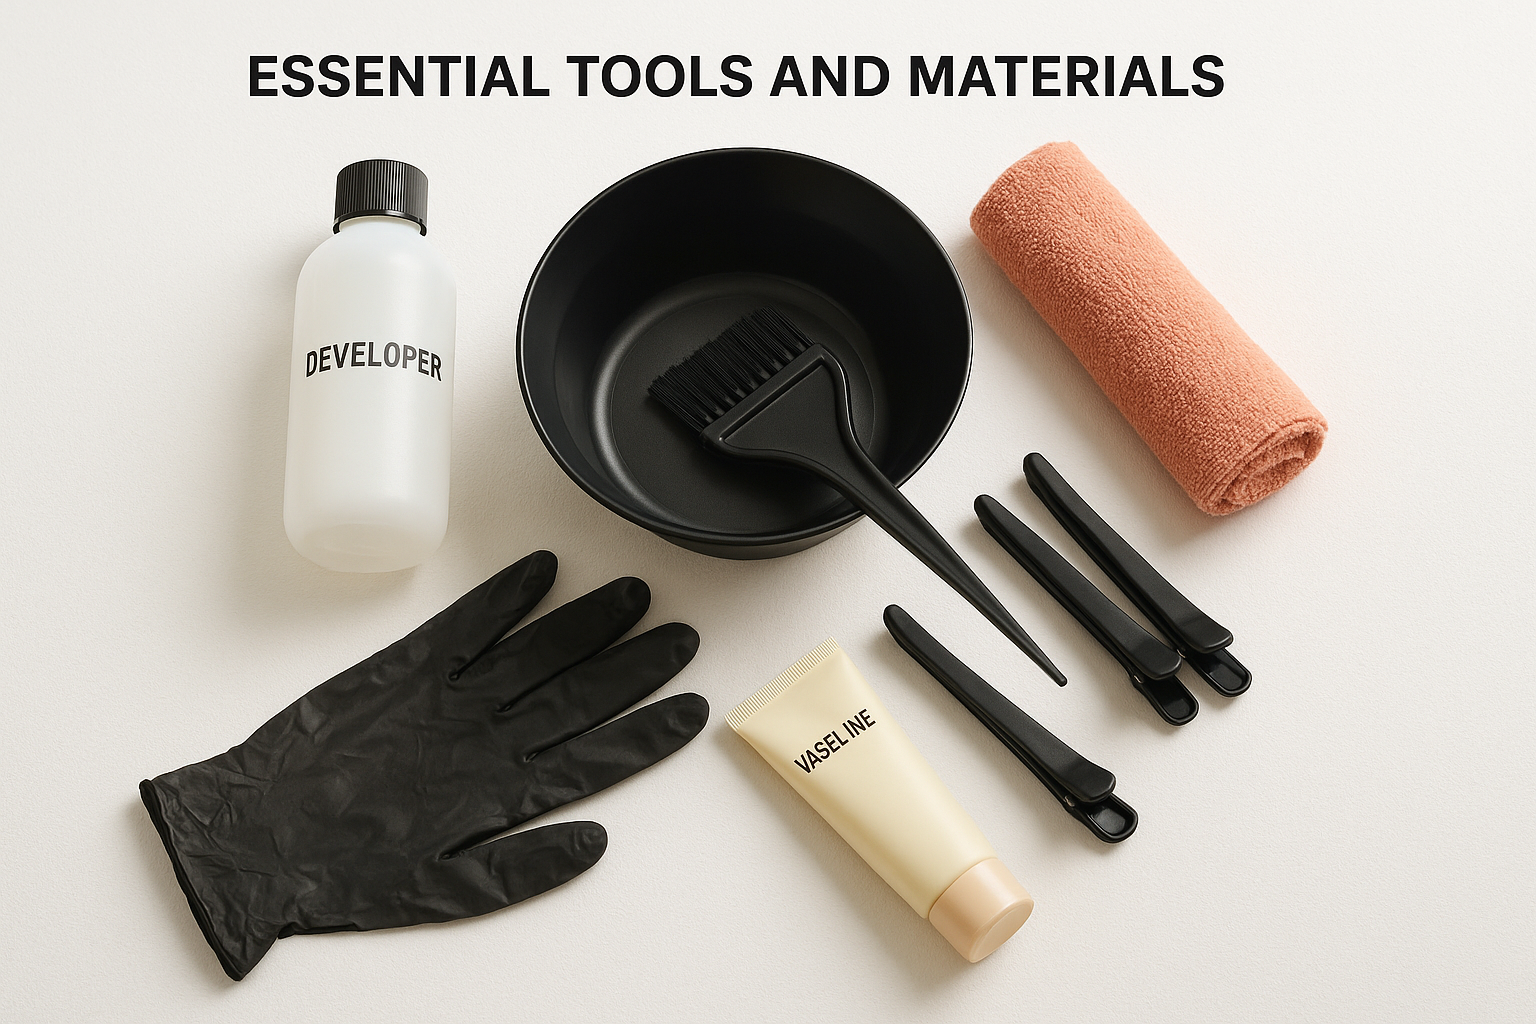
Gather these items before you start:
- Colour formula: Choose based on your target shade and starting colour (we’ll cover selection in the next section)
- Developer: 10, 20, 30, or 40 volume depending on your lifting needs
- Mixing bowl and brush: Non-metallic bowl and applicator brush for even distribution
- Sectioning clips: At least 4 clips to divide hair into workable sections
- Protective gloves: Nitrile or latex gloves to protect your hands
- Vaseline or barrier cream: Apply along hairline to prevent skin staining
- Old towel and cape: Protect your clothing and surfaces
- Timer: Track processing time accurately
- Wide-tooth comb: Distribute colour evenly through lengths
- Clarifying shampoo: Remove product buildup before colouring
- Colour-safe shampoo and conditioner: Maintain results after application
Understanding your hair’s current state
Your hair’s history directly impacts how it accepts colour and what results you’ll achieve. Natural virgin hair responds completely differently to colour than hair with years of chemical processing, yet many people ignore this crucial factor when learning how to recreate a celebrity’s hair colour shade.
Check your hair for previous colour treatments, even if they happened months ago. Hair has memory. That balayage you had last summer still affects how new colour will take today. Bleached sections lift faster than virgin roots, creating unwanted patches if you don’t account for them.
Planning your colour application around your hair’s existing condition prevents the most common disasters, from patchy results to unexpected orange tones.
Test your hair’s porosity by dropping a clean strand into water. Hair that sinks immediately has high porosity and absorbs colour quickly but fades faster. Hair that floats has low porosity and needs more processing time to accept colour properly. This knowledge lets you adjust your timing and technique accordingly.
Reference images and colour analysis
Download multiple images of your target celebrity shade taken in different lighting conditions. Studio lighting, outdoor shots, and candid paparazzi photos all reveal different aspects of the same colour. You’ll spot whether those seeming blonde highlights actually contain copper tones, or if that "jet black" includes subtle blue undertones.
Save at least three to five reference photos showing the shade from various angles. Front-facing shots show the overall tone, while side angles reveal depth and dimension. Photos with the celebrity’s face clearly visible help you match their natural colouring, which often influences whether a particular shade will suit you too.
Compare your saved images against hair colour swatches from your chosen product range. Smart Beauty’s collections include detailed shade cards showing each colour on different starting bases, helping you predict your likely outcome before you commit.
Step 1. Choose the exact shade and finish
Identifying the exact shade and finish type separates successful celebrity colour recreation from disappointing approximations. Most people make the mistake of choosing based purely on colour, ignoring the equally important texture and light reflection that make celebrity shades look so polished.
Your chosen shade needs to match both the base tone (warm, cool, or neutral) and the depth level (light, medium, or dark) visible in your reference photos. These two factors work together to create the overall effect, and missing either one produces a colour that looks "close but not quite right".
Breaking down the celebrity shade into components
Examine your reference images and identify three distinct elements: the base colour, any secondary tones, and the overall finish. Margot Robbie’s blonde, for instance, isn’t just "blonde". It contains a golden base with subtle champagne highlights and a glossy finish that catches light.
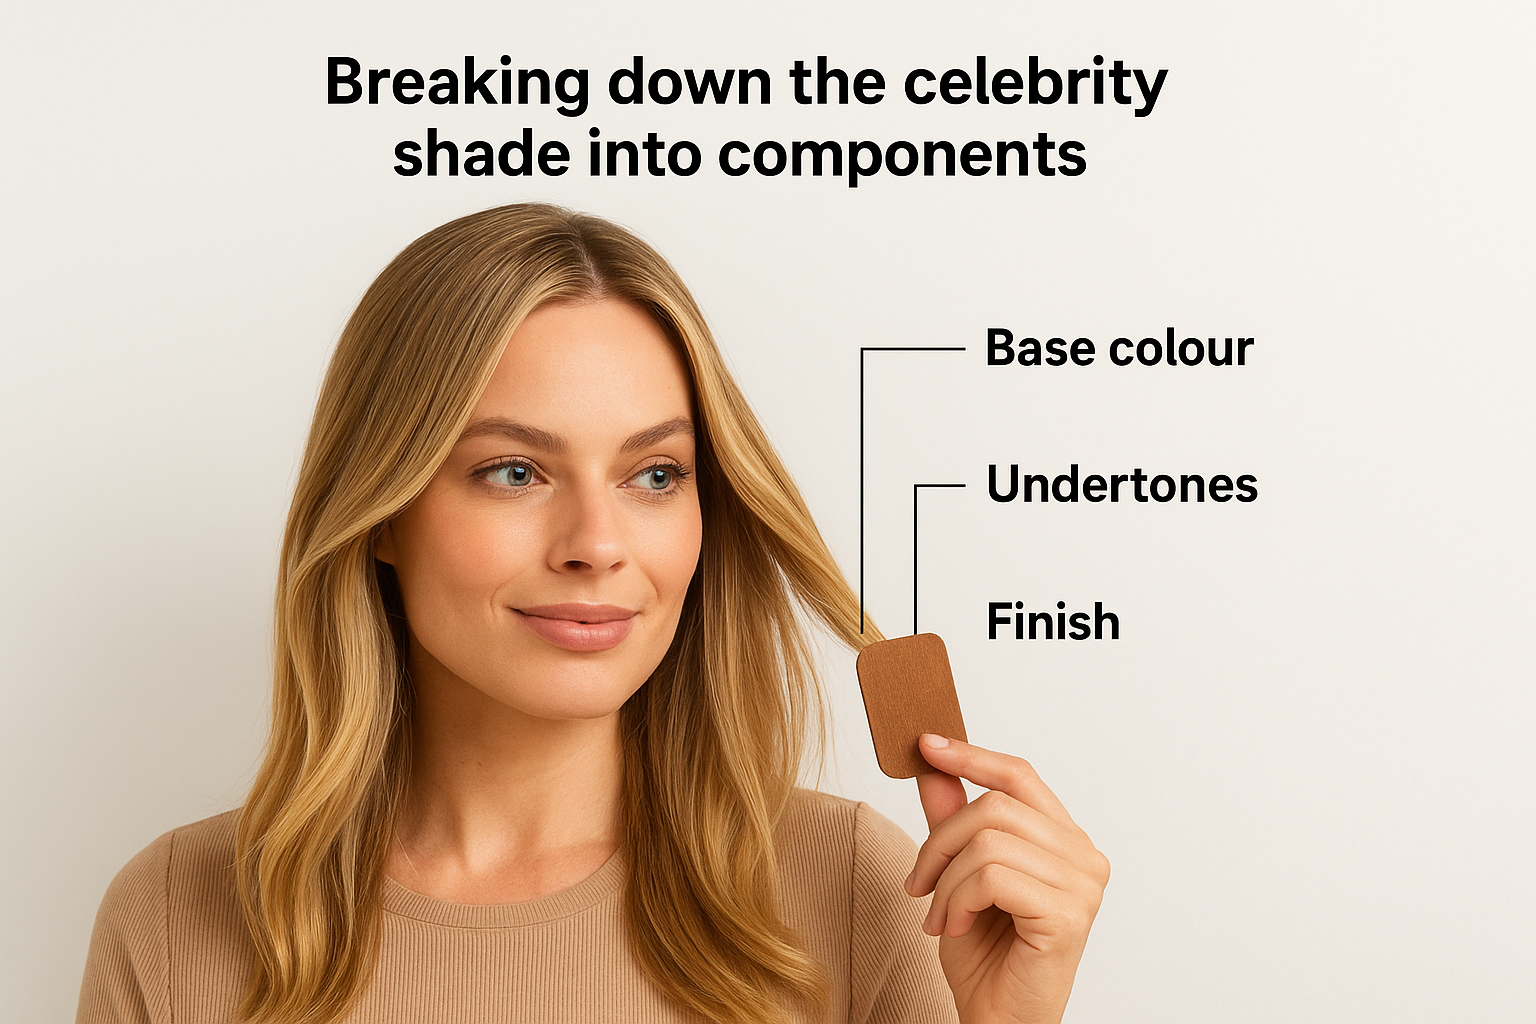
Write down your observations using this template:
- Base colour: [Primary shade name and level]
- Undertones: [Warm/cool/neutral and specific tone like golden, ash, copper]
- Dimension: [Single process, highlights, balayage, ombré]
- Finish: [Matte, glossy, metallic]
This breakdown helps you select the right product combination rather than relying on a single formula to do everything. Most celebrity shades actually combine two or three products applied strategically to create depth and movement.
Breaking complex celebrity shades into their component parts lets you recreate them accurately using available home colour products.
Selecting the right formula type
Permanent, demi-permanent, and semi-permanent formulas each deliver different results when learning how to recreate a celebrity’s hair colour shade. Permanent colour lifts your natural pigment and deposits new colour simultaneously, making it ideal for dramatic changes or covering grey. Demi-permanent deposits colour without lifting, perfect for enriching your existing shade or adding subtle dimension. Semi-permanent coats the hair shaft temporarily, suited for vibrant fashion colours or testing shades before committing.
Match your formula choice to your desired longevity and maintenance commitment:
| Formula Type | Lasts | Best For | Example Celebrity Shades |
|---|---|---|---|
| Permanent | 6-8 weeks | Complete transformations, grey coverage | Natural brunettes to blonde, significant colour changes |
| Demi-permanent | 4-6 weeks | Toning, glossing, subtle changes | Adding warmth to blonde, deepening brown |
| Semi-permanent | 2-4 weeks | Fashion colours, trial runs | Bold reds, pinks, purples, temporary changes |
Smart Beauty’s plex-enriched formulas work across all three types, protecting your hair structure while delivering that celebrity-quality shine and colour depth.
Step 2. Check your starting base and hair history
Assessing your starting colour level and chemical history prevents the most common colouring disasters when you attempt to recreate celebrity shades. Your natural base determines which colours you can achieve directly and which require pre-lightening, while previous treatments affect how your hair accepts new pigment.
Skip this assessment and you’ll likely end up with patchy results, unexpected tones, or severe damage from over-processing. Professional colourists spend several minutes examining hair before mixing a single formula, and you need to do the same at home.
Identify your natural level and current colour
Your hair’s depth level runs from 1 (black) to 10 (lightest blonde), and knowing where you sit on this scale tells you exactly how much lifting you’ll need to achieve your target celebrity shade. Hold your hair against a natural light source near a window and compare it to a professional level chart.
Natural hair levels break down as follows:
| Level | Description | Lifting Needed for Blonde |
|---|---|---|
| 1-3 | Black to darkest brown | 5-7 levels (requires bleach) |
| 4-5 | Medium to dark brown | 3-5 levels |
| 6-7 | Light brown to dark blonde | 1-3 levels |
| 8-10 | Medium to lightest blonde | 0-2 levels (toning only) |
Match your current colour against this chart before selecting products. If you’re starting at level 4 and want to achieve a level 9 blonde like Margot Robbie’s, you’ll need pre-lightening before depositing your target tone.
Document previous chemical treatments
Every colour service, bleach application, and chemical straightening treatment from the past 12-18 months impacts how new colour behaves on your hair. Previously lightened sections absorb colour faster than virgin roots, creating uneven results if you don’t adjust your application technique.
Write down all treatments you can remember, including approximate dates and products used. Hair that’s been bleached multiple times has higher porosity and grabs colour aggressively, often turning darker than intended. Chemically straightened hair may resist colour altogether or break when exposed to additional processing.
Understanding your hair’s chemical history lets you predict how it will react to new colour and adjust your timing, formula strength, and application method accordingly.
Perform a mandatory strand test
Select a small section of hair from underneath your crown, roughly the width of a cotton bud. Mix a tiny amount of your chosen formula and apply it to this hidden strand exactly as you plan to apply it to your full head.
Process the test strand for the recommended time, then rinse and evaluate the result after it dries completely. This reveals your actual outcome before you commit, letting you adjust the formula, timing, or technique if needed. Test strands take 15 minutes but prevent hours of regret when learning how to recreate a celebrity’s hair colour shade accurately.
Step 3. Plan your route: deposit, lift, or remove
Deciding whether to deposit colour, lift existing pigment, or remove unwanted tones determines your product selection and application strategy. This crucial planning stage prevents you from attempting impossible transformations or damaging your hair through incorrect processing.
Your chosen pathway depends entirely on the gap between your current level and your target celebrity shade. Each route requires different products, techniques, and realistic timeframes to achieve professional results at home.
Depositing colour directly onto your base
Direct colour deposit works when your current level matches or exceeds your target shade’s depth. You can add rich chocolate tones to light brown hair, deposit copper onto blonde, or refresh faded colour without additional lifting.
This method suits these scenarios:
- Going darker by 1-3 levels
- Adding vibrant fashion colours to pre-lightened hair
- Toning blonde or grey hair to remove brassiness
- Refreshing faded colour to its original intensity
Choose a demi-permanent or semi-permanent formula for this route, as these deposit pigment without lifting your natural colour. Smart Beauty’s plex-enriched formulas deliver rich, dimensional colour while maintaining hair integrity throughout the process.
Pre-lightening for significant colour changes
Lifting your base becomes necessary when your target shade sits 2+ levels lighter than your current colour. Attempting to recreate a celebrity’s hair colour shade that’s substantially lighter than your starting point requires bleach or high-lift colour before depositing your final tone.
Natural brunettes wanting platinum blonde, dark hair going to rose gold, or heavily coloured hair moving to pastel shades all need pre-lightening first. You’ll apply bleach to reach the appropriate base level, then tone with your target shade once your hair dries completely.
Process lifting in stages if you’re starting more than 4 levels darker than your goal. Single-session transformations from black to blonde cause severe damage and rarely achieve the desired result.
Attempting to deposit light colour onto dark hair without pre-lightening produces muddy, barely visible results that waste both product and time.
Removing problematic existing colour
Colour removal becomes essential when your hair contains incompatible tones or multiple layers of old colour blocking your target shade. Trying to go from red to blonde, or covering old box dye with fashion colours, requires stripping existing pigment before applying new colour.
Use a colour remover product rather than bleach for this route, as removers shrink artificial pigment molecules without destroying your natural colour underneath. Apply the remover, process according to instructions, then wait two weeks before depositing your celebrity-inspired shade to let your hair recover from the chemical process.
Step 4. Do a safe at-home application
Executing your colour application with proper technique and timing precision determines whether you achieve that celebrity-quality finish or end up needing colour correction. Most at-home disasters happen during application, not because of product failure but because people rush the process or skip crucial preparation steps.
Your application technique matters just as much as product selection when learning how to recreate a celebrity’s hair colour shade. Professional colourists spend years mastering even distribution and timing, but you can achieve similar results by following a structured approach and resisting the urge to speed through the process.
Set up your workspace properly
Prepare your bathroom or application area before you mix any colour, as most formulas begin processing the moment you combine ingredients. Clear your countertop, lay down old towels to catch drips, and arrange all tools within easy reach.
Position your supplies in this order:
- Mixed colour formula in non-metallic bowl
- Applicator brush and wide-tooth comb
- Sectioning clips (at least 4)
- Timer set and ready
- Damp cloth for immediate cleanup
- Spare gloves for touch-ups
Apply Vaseline or barrier cream along your hairline, ears, and neck before you start. This prevents skin staining and saves you from scrubbing colour off your face for days afterward.
Follow the correct sectioning technique
Divide your hair into four quadrants using a centre part from forehead to nape, then a horizontal part from ear to ear. Clip each section securely out of your way, starting with the back sections first.

Work through each quadrant systematically, taking quarter-inch subsections and applying colour from roots to ends. Start at the back of your head where hair is typically coarsest and needs the longest processing time, moving toward the front hairline last.
Applying colour in thin, methodical sections ensures complete saturation and prevents patchy results that reveal your amateur technique.
Time your processing accurately
Start your timer immediately after completing your application, not when you began mixing the colour. Processing times vary based on your chosen formula, desired result, and hair’s current condition, but most permanent colours need 30 to 45 minutes to develop fully.
Check your colour progress at regular intervals:
| Time Elapsed | Action Required |
|---|---|
| 10 minutes | Check a test strand at the nape |
| 20 minutes | Assess colour development and tone |
| 30 minutes | Verify target shade achievement |
| 35-45 minutes | Maximum processing time (don’t exceed) |
Rinse thoroughly with lukewarm water until the water runs completely clear, then apply the colour-safe conditioner included with your kit. Your hair needs this post-colour treatment to seal the cuticle and lock in your new celebrity-inspired shade.
Step 5. Maintain the colour and fix common issues
Protecting your newly achieved celebrity shade requires intentional aftercare and quick problem-solving when issues emerge. Your colour starts fading the moment you rinse it out, and how you treat your hair over the following weeks determines whether you maintain that professional finish or watch it deteriorate into something unrecognizable.
Most colour problems stem from preventable mistakes in your daily routine rather than the application itself. Understanding how to maintain and troubleshoot your shade keeps you looking polished between touch-ups.
Establish a colour-safe routine
Switch to sulphate-free shampoo immediately after colouring, as sulphates strip pigment faster than any other ingredient in hair products. Your colour survives far longer when you wash with gentle formulas designed specifically for colour-treated hair.
Limit washing to two or three times weekly rather than daily, using dry shampoo between washes to absorb oil without affecting your colour. Hot water opens your hair cuticle and releases pigment, so rinse with the coolest temperature you can tolerate.
Apply a colour-depositing treatment weekly to refresh your tone and prevent fading. Smart Beauty’s colour refreshers contain just enough pigment to maintain vibrancy without requiring a full recolour, extending the life of your celebrity-inspired shade by several weeks.
Protecting your investment in time and product requires consistent maintenance, not occasional attention when you notice your colour has already faded significantly.
Address common colour problems quickly
Colour corrections become more difficult the longer you wait, so tackle issues as soon as they appear. Your response time often determines whether you need a simple fix or a complete colour restart when learning how to recreate a celebrity’s hair colour shade.
Fix these frequent problems using targeted solutions:
| Problem | Cause | Quick Fix |
|---|---|---|
| Brassy yellow tones | Pigment fading, mineral deposits | Purple shampoo 2-3 times weekly |
| Patchy colour | Uneven application, porosity issues | Apply colour only to faded sections |
| Too dark | Over-processing, wrong level choice | Clarifying shampoo wash, wait 2 weeks, then lighten |
| Unwanted warmth | Wrong toner, incorrect base assessment | Blue or green toner to neutralize |
| Rapid fading | High porosity, inadequate sealing | Protein treatment, then reapply colour |
Book a strand test before attempting corrections to verify your chosen fix produces the expected result. Most problems resolve with simple adjustments rather than complete colour removal.
![how to recreate [celebrity]’s hair colour shade infographic](https://cdn.rankyak.com/27730/how-to-recreate-celebritys-hair-colour-shade-infographic.png)
Next steps
You’ve learned the five essential steps for recreating any celebrity’s hair colour shade from your own bathroom, from initial assessment through ongoing maintenance. Your success depends on honest evaluation of your starting point, careful product selection, and disciplined application technique rather than expensive salon visits.
Start by gathering your reference images and conducting strand tests before you commit to a full application. This preparation prevents costly mistakes and ensures your chosen shade actually suits your natural colouring and lifestyle. Take your time with each step rather than rushing through the process.
Browse Smart Beauty’s bold colour collections to find the exact shades and tones that match your target celebrity look. Our plex-enriched formulas deliver professional results while protecting your hair’s integrity, making celebrity-inspired transformations achievable without compromising hair health. Your dream shade waits in your bathroom, not a salon chair.