Going from dark to light is one of the most dramatic hair transformations you can achieve, but it’s also one of the trickiest to get right. Bleaching dark hair at home requires more than just slapping on a lightener and hoping for the best. Without the right technique, you risk ending up with patchy results, stubborn orange tones, or worse, damaged, straw-like strands.
The good news? With proper preparation and quality products, you can lift dark hair safely and achieve beautiful, even results from your own bathroom. Whether you’re aiming for a sun-kissed balayage, platinum blonde, or simply lightening a few shades to refresh your look, this guide walks you through every step of the process.
At Smart Beauty, we’ve formulated our bleach kits with plex technology and gentle, PPD-free ingredients specifically for home colourists who want professional results without compromising hair health. Below, you’ll find everything you need to know, from choosing the right developer strength to neutralising brassiness and caring for your freshly lightened locks.
Know the risks, levels, and realistic results
Before you open that bleach packet, you need to understand exactly what you’re working with. Dark hair holds more pigment than lighter shades, which means it requires stronger processing and multiple sessions to lift properly. Rushing the process or underestimating your starting level is the fastest route to patchy, brassy results and breakage you’ll regret.
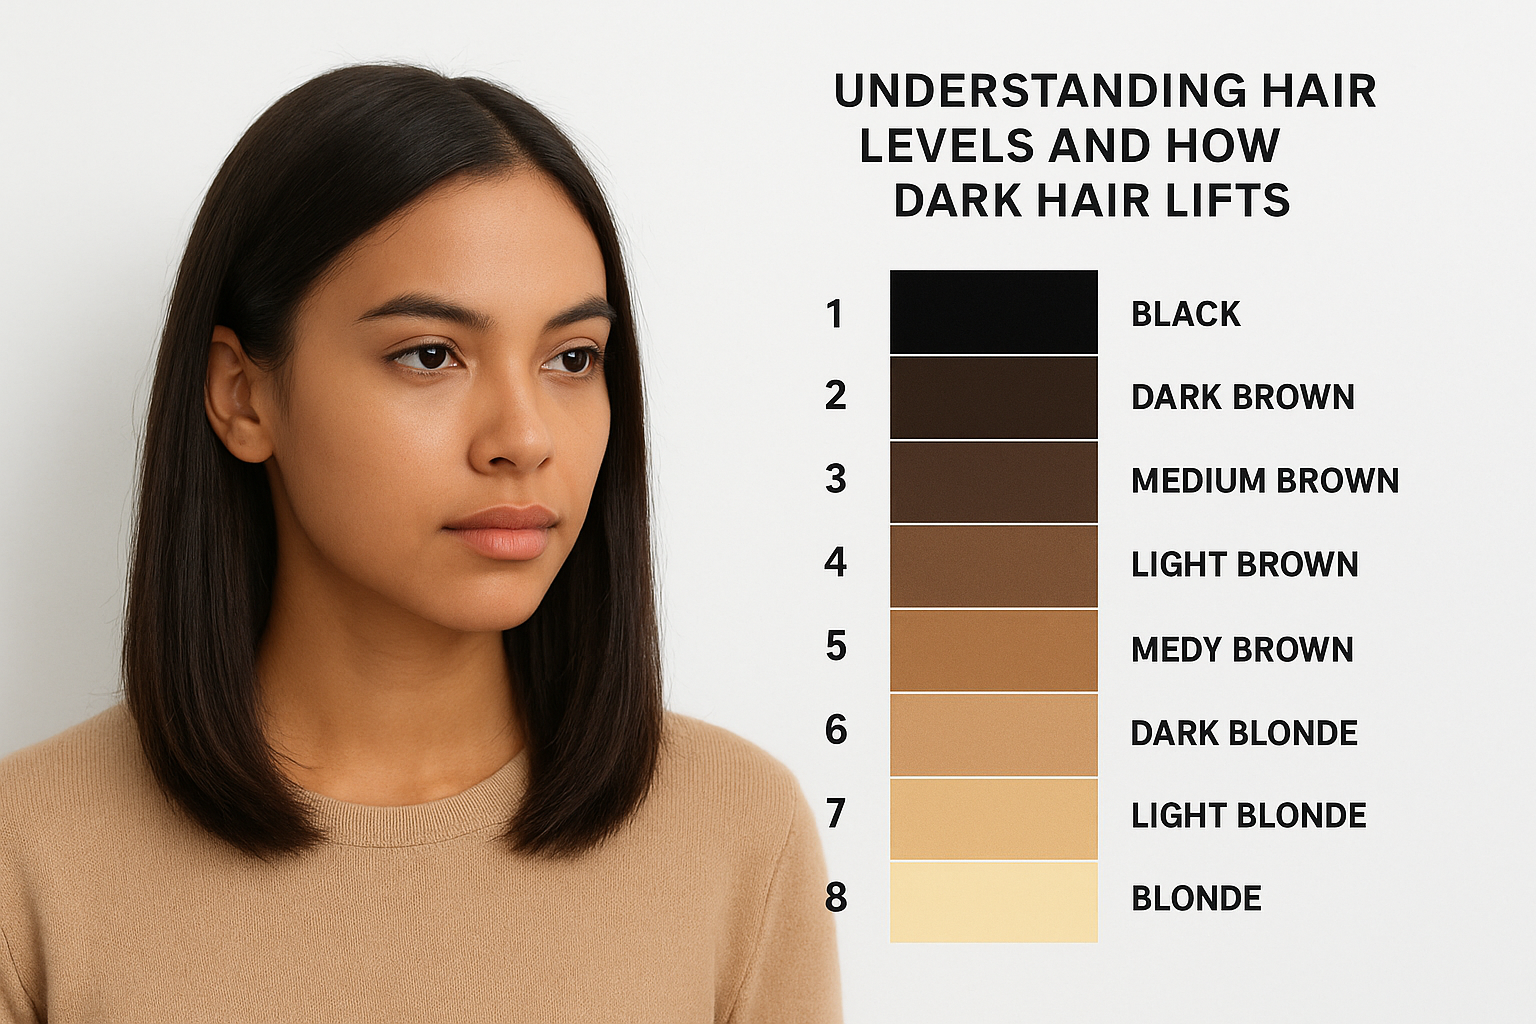
Understanding hair levels and how dark hair lifts
Your natural hair colour sits somewhere on a scale from 1 to 10, where 1 is jet black and 10 is the lightest blonde. Most people with dark hair start at level 2 to 4, and bleach strips away melanin to reveal the underlying warm tones beneath. Each level you lift exposes more red, orange, and yellow pigments that you’ll need to neutralise later with toner.
Here’s what you can expect at each stage of lift:
| Starting Level | Description | Typical Lift Per Session | Underlying Tones Revealed |
|---|---|---|---|
| 1-2 | Black to darkest brown | 2-3 levels maximum | Deep red, then orange |
| 3-4 | Dark brown | 3-4 levels | Orange to bright orange |
| 5-6 | Medium brown | 4-5 levels | Orange to yellow-orange |
| 7-8 | Light brown to dark blonde | 5+ levels | Yellow to pale yellow |
Virgin hair (hair that’s never been chemically treated) lifts more predictably than previously dyed hair. If you’ve used permanent or demi-permanent colour, expect slower, uneven lifting because artificial pigment molecules are harder to remove than natural melanin.
Real risks you need to manage
Bleaching dark hair at home carries genuine risks that you can’t ignore. Over-processing causes breakage, leaving you with hair that snaps off at the slightest touch. Your strands swell when bleach opens the cuticle, and if you leave it on too long or use developer that’s too strong, the internal structure collapses.
Chemical burns are another real concern, especially around your hairline and scalp. Bleach is alkaline with a pH of 9 to 11, and prolonged contact with skin causes irritation, redness, and in severe cases, blistering. This is why strand testing and timing are non-negotiable, not optional extras.
You also risk permanent texture changes. Hair that lifts from level 2 to level 8 in one session often becomes porous, frizzy, and impossible to style. The cuticle layer sustains damage that no deep conditioner can fully repair, which is why professionals always recommend multiple sessions spaced weeks apart.
Set realistic colour expectations
If your hair is naturally dark brown or black, you won’t achieve platinum blonde in a single session. Expect to reach level 6 or 7 at most on your first lift, which translates to a medium golden blonde or light copper tone. Anything lighter requires a second application after your hair has recovered, typically two to four weeks later.
Most dark hair needs at least two bleaching sessions to reach pale blonde tones without severe damage.
Brassiness is inevitable, not a sign of failure. When you lift dark hair, you expose the warm pigments underneath, which means you’ll see orange at level 5 to 6 and yellow at level 8 to 9. Toning afterwards neutralises these tones using purple or blue-based products, but you need to lift to the right base level first. Trying to tone hair that’s only reached level 6 won’t give you the icy blonde you’re imagining; it’ll just look muddy.
Prep your hair and set up your workspace
Walking into a bleaching session unprepared guarantees messy results and potential damage. Your hair’s current condition and your workspace setup directly impact how evenly the bleach lifts and how safely you can complete the process. Preparation takes 15 to 20 minutes but saves you hours of correcting mistakes or dealing with chemical burns on your furniture.
Wash and assess your hair condition
Wash your hair 24 to 48 hours before bleaching, not on the same day. Your scalp produces natural oils that create a protective barrier against the harsh chemicals, and freshly washed hair is more vulnerable to irritation. Skip conditioner in that final wash, as silicone coatings block bleach penetration and cause patchy lifting.
Check your hair for existing damage before you commit. Bleaching hair that’s already compromised leads to breakage, not beautiful blonde. Pull gently on a few strands when they’re wet; if they stretch excessively or snap easily, postpone bleaching and use a protein treatment for two weeks first. Look for split ends, roughness, or previous colour that’s faded unevenly, as these areas will process differently.
Hair that’s already damaged will break during bleaching, not lighten beautifully.
Detangle completely using a wide-tooth comb before you mix any bleach. Knots prevent even application and create darker patches where product can’t reach the hair shaft properly.
Gather your supplies and protect your space
Set up everything you need within arm’s reach before opening your bleach powder. Scrambling for supplies mid-process wastes time and risks over-processing sections you’ve already applied. You’ll need:
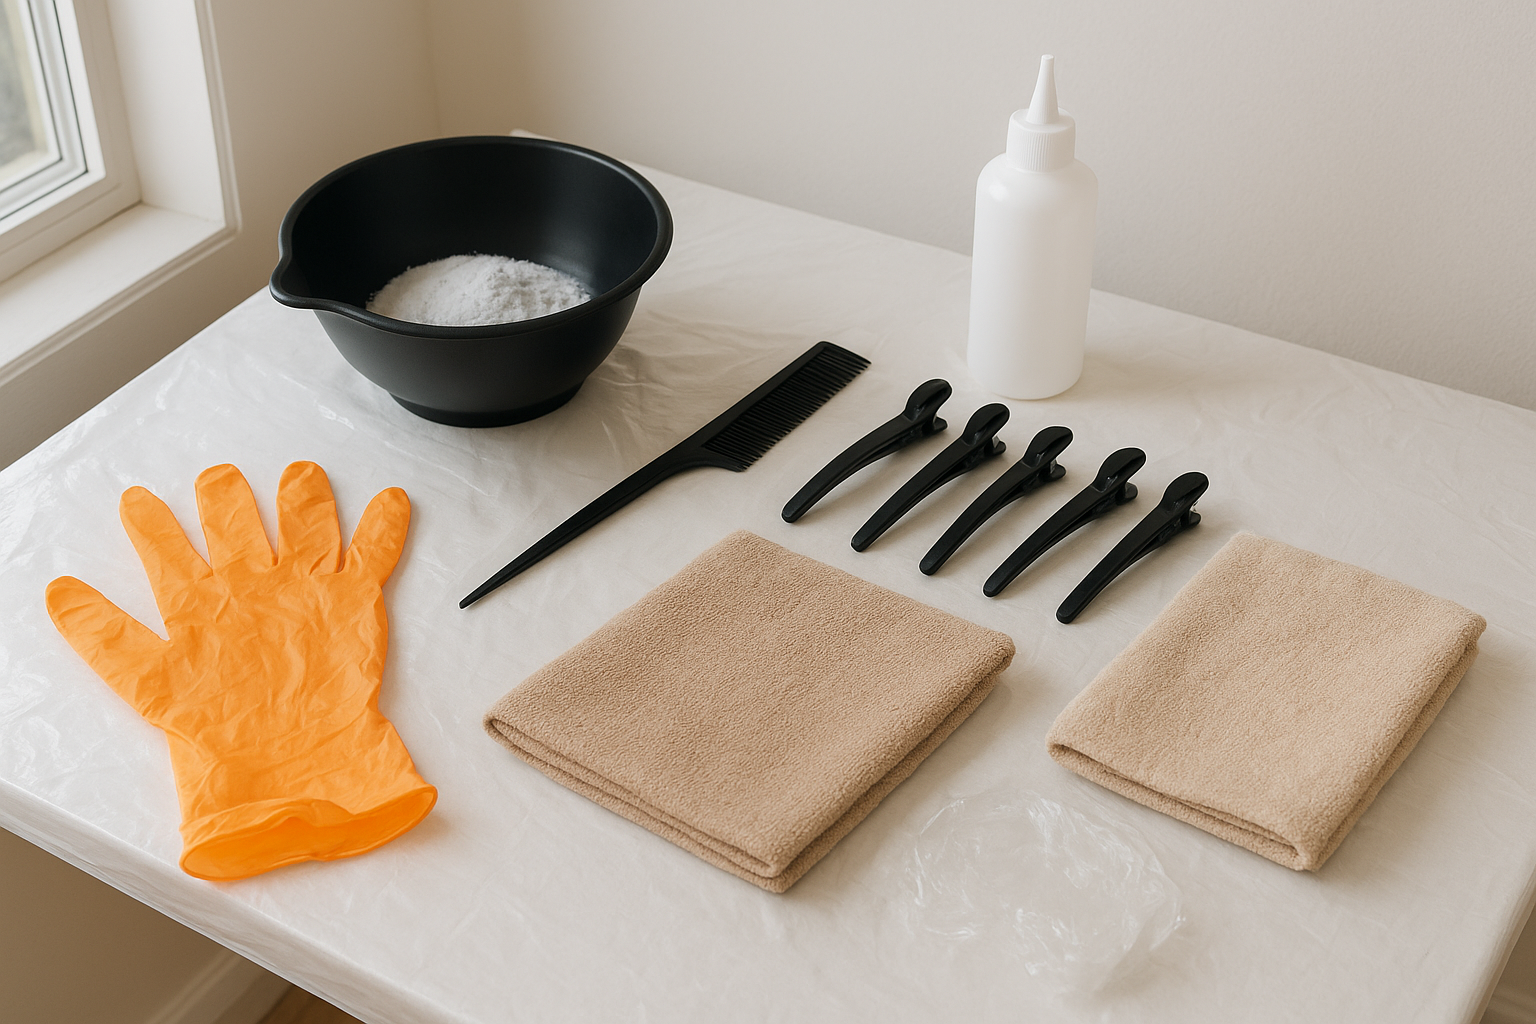
- Bleach powder and developer (correct volume for your hair)
- Non-metallic mixing bowl and brush
- Sectioning clips (at least 6)
- Timer with alarm
- Petroleum jelly for protecting your hairline
- Old towel or cape
- Plastic gloves (two pairs minimum)
- Plastic wrap or shower cap
Cover all surfaces with bin bags or old towels because bleach stains everything it touches. Your bathroom floor, counter, and any nearby fabric need protection. Remove jewellery, wear old clothes you don’t mind ruining, and keep paper towels close for wiping drips immediately.
Position a mirror where you can see the back of your head clearly. Bleaching dark hair at home requires seeing every section you’re working on, and missed spots show up starkly once you rinse. Open a window or turn on ventilation because bleach fumes build up quickly in enclosed spaces and cause headaches.
Step 1. Patch test and strand test
Skipping these tests is the single biggest mistake you can make when bleaching dark hair at home. A patch test protects you from allergic reactions that can range from mild irritation to severe blistering, while a strand test reveals exactly how your hair will respond to the bleach mixture. These tests take minimal time but prevent disasters that cost weeks to fix.
Run a patch test 48 hours before
Your skin might react badly to bleach powder or developer, even if you’ve used similar products before. Mix a small amount of your chosen bleach and developer (about a teaspoon of each) in a non-metallic bowl, then apply a thin layer to the inside of your elbow or behind your ear.
Leave the mixture on for the full processing time you plan to use on your hair, typically 30 to 45 minutes. Rinse thoroughly with cool water and check the area immediately, then again after 24 and 48 hours. Redness, swelling, itching, or burning means you cannot use this product on your scalp. Try a different brand or consult a professional instead.
A negative patch test today doesn’t guarantee you won’t react tomorrow; always test before each bleaching session.
Document what you tested (brand, developer volume, timing) so you know exactly what’s safe for your next session.
Do a strand test on hidden hair
Select a section of hair from underneath near your nape that’s about half a centimetre wide and hidden when your hair hangs normally. This area represents your natural colour without sun lightening and gives you accurate results. Mix your bleach according to package directions using the developer volume you plan to use.
Apply the mixture thoroughly to your test strand from roots to ends, then set a timer for 10-minute intervals. Check the colour every 10 minutes, noting the level it reaches at each check. Rinse when you achieve your target lightness or when 45 minutes have passed, whichever comes first.
Your strand test shows you three critical pieces of information:
- How long your hair needs to reach your desired level
- What underlying tones appear (orange, red, yellow)
- Whether your hair texture can handle bleaching without severe damage
Hair that feels gummy, stretches excessively, or breaks easily during the test cannot withstand a full bleaching session. If your test strand shows these signs, you need to rebuild your hair’s strength with protein treatments for at least two weeks before attempting to bleach.
Step 2. Choose developer strength and mix bleach
Developer volume determines how much your hair lifts, and choosing the wrong strength causes either insufficient lightening or severe damage. The percentage refers to how much hydrogen peroxide the developer contains, which activates the bleach powder and breaks down melanin. When bleaching dark hair at home, you need enough lift to see real results without destroying your hair’s structure in the process.
Match developer volume to your hair
Your starting level and desired lift dictate which developer strength you should use. 10 volume (3%) developer deposits colour without significant lifting and won’t work for dark hair that needs to go lighter. Most people with naturally dark hair need 20 or 30 volume to see noticeable results, while 40 volume remains reserved for specific situations only.
Here’s how to choose the right developer strength:
| Developer Volume | Best For | Lifting Power | When to Avoid |
|---|---|---|---|
| 20 vol (6%) | Level 3-4 dark hair, first-time bleachers | 1-2 levels lift | Previously damaged hair |
| 30 vol (9%) | Level 1-3 very dark hair, stubborn pigment | 2-3 levels lift | Fine or fragile hair |
| 40 vol (12%) | Resistant level 1 hair, professional use only | 3-4 levels lift | Most home situations |
Start with 20 volume for your first session if you’re uncertain about your hair’s tolerance. You can always bleach again after your hair recovers, but you cannot reverse chemical damage from developer that’s too strong.
Using 40 volume developer at home significantly increases your risk of chemical burns and irreversible hair damage.
Mix bleach powder correctly
Measure your bleach powder and developer using the ratio specified on your product packaging, typically 1:2 (one part powder to two parts developer). Use a non-metallic bowl and brush because metal reacts with bleach and compromises the lifting process. Add the developer to the powder slowly, stirring constantly until you achieve a smooth, yoghurt-like consistency.
Your mixture should coat the brush without dripping but shouldn’t be so thick that it clumps. Mix only what you need for one application because bleach loses potency after 30 minutes once activated. For shoulder-length dark hair, start with 60g of powder mixed with 120ml of developer, adjusting based on your hair’s thickness and length.
Apply the mixture immediately after mixing to maximise the bleach’s effectiveness. The chemical reaction begins as soon as powder meets developer, and waiting reduces your lifting power significantly.
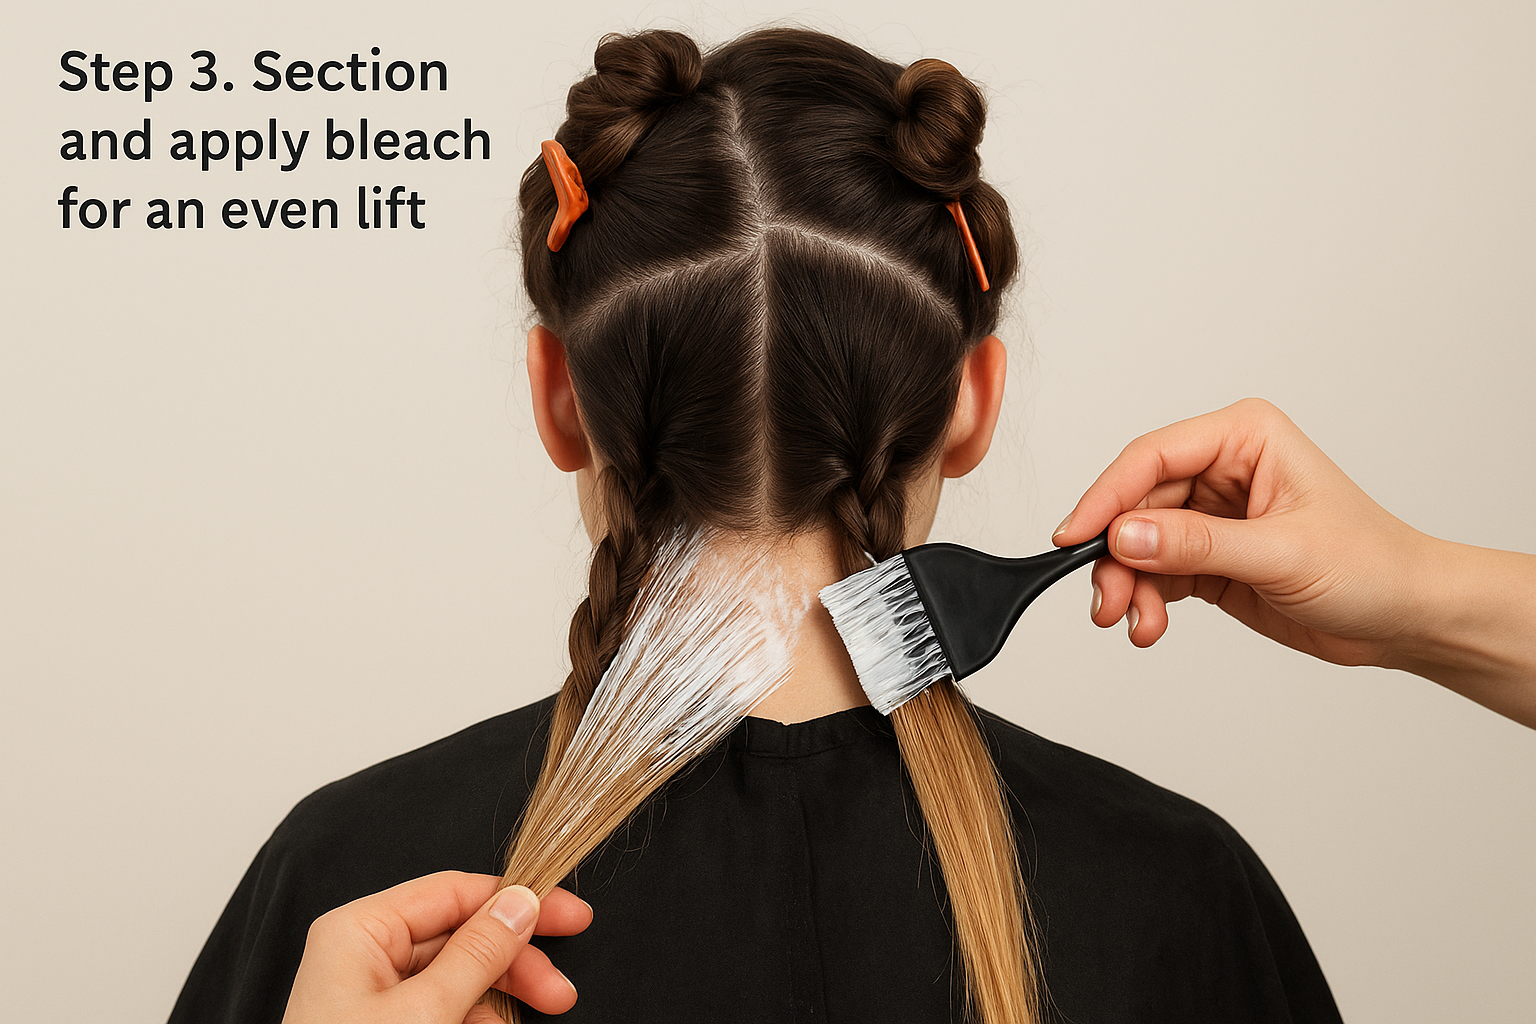
Step 3. Section and apply bleach for an even lift
Proper sectioning makes the difference between patchy, uneven results and a professional-looking lift. When bleaching dark hair at home, you cannot simply slap product on randomly and expect consistent colour. Your roots process faster than your ends due to body heat, and thick sections prevent bleach from saturating fully, leaving you with dark streaks that ruin the overall effect.
Divide your hair into manageable sections
Create four large quadrants by parting your hair down the centre from forehead to nape, then across from ear to ear. Twist each section and secure it with a clip, keeping it off your neck and shoulders. These quadrants give you control over your application and prevent bleach from drying out on sections you’ve already covered.
Within each quadrant, work in horizontal subsections no thicker than one centimetre. Thick sections block bleach penetration and create uneven lifting where the outer layer processes while the inner hair stays dark. Start at the bottom of each quadrant and work upward, clipping the remaining hair out of your way as you progress.
Sections thicker than one centimetre prevent bleach from saturating fully, causing patchy results you’ll see clearly once you rinse.
Apply bleach from mid-lengths to ends first
Load your brush generously with bleach mixture and apply to the mid-lengths and ends first, staying at least 2.5 centimetres away from your scalp initially. Your roots contain more moisture and process faster due to body heat, so starting there guarantees over-processed, brassy roots and under-processed ends.
Work quickly but thoroughly, saturating each subsection completely on both sides. You should see bleach coating every strand without gaps or thin patches. Hold each section taut as you brush to ensure even coverage from all angles.
Apply bleach in one continuous motion from mid-length downward, then flip the section and repeat on the underside. Missed spots show up starkly after rinsing, especially on dark hair where any unprocessed areas remain noticeably darker than lifted sections.
Process roots separately for even results
Wait 10 to 15 minutes before applying bleach to your roots, depending on how fast your hair typically processes. This delay compensates for the faster processing that body heat causes and prevents your roots from lifting several levels lighter than the rest of your hair.
When you’re ready for roots, apply bleach to the root area only using the same sectioning method. Overlap slightly with the previously bleached hair (about 0.5 centimetres) to avoid a demarcation line, but avoid coating the same hair twice as this increases damage risk significantly.
Work systematically through all sections, maintaining the same application thickness throughout. Consistency in product amount and technique produces consistent lifting, which is what separates professional results from DIY disasters.
Step 4. Time it, check lift, and rinse properly
Timing separates successful bleaching from damaged, over-processed hair. Once you’ve applied bleach to all sections, your clock starts ticking on the most critical phase of bleaching dark hair at home. You cannot leave bleach on indefinitely hoping for better lift, and you cannot rinse too early expecting to bleach again immediately. Your hair’s integrity depends on precise timing and careful monitoring throughout the entire processing period.
Track processing time accurately
Set a timer the moment you finish applying bleach to your final section, not when you started the first section. This ensures your earliest-applied areas don’t sit processing for 60 minutes while you work through the rest of your head. Most dark hair needs 30 to 45 minutes of processing time, but your strand test provides the specific timing for your hair.
Check your timer every 10 minutes and resist the urge to rinse early when you see orange tones appearing. Dark hair must pass through red and orange stages before reaching blonde, and rinsing at level 5 leaves you stuck with copper tones that won’t tone out properly.
Check lift progress at intervals
Starting at 20 minutes, check your lift progress by gently wiping bleach from a small section at the back of your head using a damp paper towel. Look at the colour underneath rather than the bleach mixture itself, which appears lighter than your actual hair colour. Compare what you see to your target level, remembering that hair looks slightly darker when wet.
Check the same test section every 5 to 10 minutes after your initial check. Your hair should progress gradually through colour stages, moving from dark brown to red-brown, then orange, then yellow-orange as it lifts. If you see no change after 30 minutes, your bleach mixture has exhausted its lifting power and continuing to leave it on only dries out your hair without further lightening.
Hair that shows no lift progression after 30 minutes won’t lighten further, regardless of how long you leave bleach on.
Rinse thoroughly with cool water
When your hair reaches the target level from your strand test, rinse immediately with cool water before shampooing. Start at your scalp and work downward, letting water run for at least five minutes to remove all bleach residue. Hot water swells the cuticle further and increases damage, while cool water seals the cuticle and stops the chemical process.
Shampoo twice with a clarifying or sulphate-based formula to remove any remaining bleach particles, then apply a deep conditioning treatment immediately. Leave the conditioner on for 10 to 15 minutes before rinsing with cool water again. Your hair remains vulnerable for 48 hours after bleaching, so handle it gently and avoid heat styling during this recovery period.
Step 5. Tone to beat orange and brassiness
Bleaching dark hair at home reveals warm underlying pigments that you must neutralise to achieve the cool, natural-looking blonde you’re aiming for. Your freshly bleached hair sits at an orange or yellow base level, and without toner, you’re left with brassy tones that look unfinished and unnatural. Toning deposits cool pigments that counteract warmth, transforming your lifted hair into a polished, salon-quality result.
Understanding toner and when to use it
Toner works using colour theory principles, where opposite shades on the colour wheel cancel each other out. Purple neutralises yellow, blue cancels orange, and green counteracts red. You apply toner after bleaching once your hair has been washed, deep conditioned, and towel dried, but wait at least 24 hours if your hair feels fragile or over-processed.
Your lifted base level determines which toner shade you need. Hair at level 7 or below shows orange tones that require blue-based toners, while level 8 to 9 displays yellow that needs purple toners. Applying purple toner to orange hair creates muddy, greyish results instead of the cool blonde you want.
You cannot tone hair that hasn’t lifted enough; orange hair needs to reach at least level 7 before purple toner produces cool results.
Choose the right toner shade for your lifted level
Match your toner to your current base level, not the colour you’re hoping to achieve. Check your hair in natural daylight after rinsing out bleach to see your true lifted level, as bathroom lighting often distorts colour perception. Use this guide to select the correct toner:
| Your Lifted Level | Dominant Tone | Toner Shade Needed | Expected Result |
|---|---|---|---|
| 6-7 | Bright orange | Blue-based ash toner | Medium neutral blonde |
| 7-8 | Yellow-orange | Blue-violet toner | Cool light blonde |
| 8-9 | Golden yellow | Purple or violet toner | Pale ash blonde |
| 9-10 | Pale yellow | Light purple toner | Platinum or silver |
Use a 10 volume developer with your toner for gentle deposit without additional lifting. Mixing toner with 20 volume causes unnecessary damage and pulls more warmth from your already-processed hair.
Apply toner for even, cool results
Section your hair exactly as you did for bleaching to ensure consistent toner coverage throughout. Apply toner quickly from roots to ends in one continuous motion, saturating each section completely. Your hair should look evenly coated without patches or thin areas.
Process toner for 15 to 30 minutes maximum, checking every 5 minutes starting at 10 minutes. Rinse with cool water when you achieve your desired tone, then condition thoroughly. Toner fades gradually over two to three weeks, so plan to refresh it monthly to maintain your cool blonde.

A quick recap and next steps
Bleaching dark hair at home successfully requires preparation, patience, and proper technique. You’ve learned how to assess your hair’s condition, choose the right developer strength, section and apply bleach evenly, time the process accurately, and tone out brassiness for polished results. Each step matters equally, and skipping any of them increases your risk of damage or disappointing colour.
Remember that multiple sessions produce better results than rushing to platinum in one go. Your hair needs recovery time between bleaching sessions, typically two to four weeks minimum. Deep condition weekly and avoid heat styling during this period to maintain your hair’s integrity.
Ready to start your lightening journey with products designed specifically for safe home use? Browse our Lighten & Tone System for vegan, plex-enriched bleach kits that lift dark hair gently while protecting its structure. Each kit includes everything you need for confident, controlled lightening that respects your hair’s health.